
Automating your Ebook builds
In a previous blog post I talked about a tool that I use to help patch the OPF file in an EPUB so it can be used better with a MOBI (to be clear, you can use the default no problem, I just wanted to be able to add extra entries to the nav and optionally remove the cover).
With this post, I wanted to cover how I use that tool in my build chain so that I can automatically produce an EPUB, a PDF, and a MOBI version of my book any time I make an edit. By automating all of this, I make my life a lot easier; I get the computer to do all the boring work so I don't have to.
- The final versions are ready in a few seconds
- I keep one master document, so that all versions are up to date
- There no chance of accidently making an error - once you're happy with the results, you know it'll always be the same.
So, with that in mind, this is my guide on automating your Ebook builds (with amazing graphics).
The tools
We're going to be using the power of the command line in order to chain all our commands together. If you're not familiar with the command line, or terminal, it's a way of calling programs with code, without going through a GUI (using the mouse to double-click on an icon, etc). Most programs allow themselves to be called through the command line.
We're going to be writing all our commands into a special file called a batch file (.bat) (called a shell script (.sh) if your on a Mac) which will allow us to run it whenever we want without having to remember all the commands.
Pandoc
This is the workhorse of the bunch, and it's really a fantastic tool. Pandoc is a document converter, taking a document in one format and outputting it in another. We'll use this to making our EPUB and PDF.
Simply head over to the Pandoc site and download it.
For making our PDF, we'll need a version of LateX, which is simply a tool used to create PDFs programatically (for an ubiquitous format, they're surprisingly finicky to get right). Depending on your platform, download MiKTeX (Windows) or MacTeX (Mac). When you're installing, make sure that you select the option to allow it to automatically download whatever packages it needs, otherwise you'll have problems with the script (as it'll be waiting for an answer to a question that you won't see).
KindleGen
KindleGen is Amazon's program for creating MOBIs from EPUBs (or from scratch if you have the right files). This lets you create the final Kindle file and see how it looks before you release your book - which is obviously useful.
You can get it from the Amazon website. Remember the path where you unzip it as you'll need it later.
One thing to keep in mind when making the MOBI is that the current advice from Amazon is to upload your cover with your file and they'll combine it in the final product, rather than having it already combined. This is where the OPFPatch program comes in. When building, we'll create two MOBI files; one with a cover and one without (for distributing outside of Amazon if you want).
OPFPatcher
This is the program I use to patch the OPF file in the generated EPUB to do a few things:
- Optionally remove the cover
- Optionally add a link for the start of the book, so when readers first open the book, it's on the right page
- Optionally add a link for the dedication section
- Optionally add a link for the acknowledgements section
- Optionally add a link for the back-of-the-book section
I've covered the OPFPatcher in a previous post, so you can head over there if you want to read more about it and how to get set up, or just go and grab the source.
7ZIP
We create our MOBI file from our EPUB, but before we do that, we want to patch the OPF file, to add a few entries in the menu and optionally remove the cover file. To get at the OPF file, we need to unzip the EPUB, which is where 7Zip comes in (Windows actually comes with a built-in ZIP, but I couldn't find a way to access it through the command line). It's a fantastic program that I recommend having, even outside of this.
You'll only need this on Windows as Mac has its own built-in, so if that's you, you can download 7Zip here
PDFToolkit
When creating our PDF, we'll want a full page image for the cover, while having the proper margins for all the other pages. Rather than mess around trying to hack something in LateX, I took the simpler approach of producing two PDFs, and then combining them into the final product. PDFToolkit allows me to do that.
As a side note, it can do a hell of a lot more, so if you're interested, feel free to dive in. You can download PDFToolkit here.
A VERY quick primer on the command line
To get you up to speed so that you're a bit more comfortable reading the shell script attached to this post (as you'll need to edit it), here's a quick rundown on what's what.
To edit the file, right-click on it, and select Edit in Notepad or whatever you text editing program of choice is (NOTE: use an editor that can save to plain text - i.e. don't use Word). If you have a program like the fantastic Notepad++ or SublimeEdit etc, then use that, as you'll get colour coding, which will make your life easier. NOTE: plain Notepad or Wordpad will still get the job done, it's just easier when everything's coloured.
Now, on to working in the command line.
Comments
Any line that starts with :: is considered a comment and won't be executed. If a particular step isn't working, then you can comment it out (i.e. ignore it), by adding :: to the start of the line.
:: I can write whatever I want here as it's going to be ignoredPrinting & debug messages
Any line that starts with echo will print to the console (the window that you see when you run your script). Use this to display messages or understand what's going on.
echo Starting super complicated process...Variables
Any line that starts with set is declaring a variable, which we'll use to make our life easier. The format is set KEY=VALUE, which means that any time we use %KEY% (the name of the variable surrounded by % symbols, the script will substitue in VALUE). At the top of the script, you'll find some variables for paths to programs used. Replace the values (between the quote marks) with the right path for your computer.
set PATH_TO_FILE="C:/Users/.../myFile.txt"
echo %PATH_TO_FILE%
Run-on lines
Any line that ends with ^ is a run-on line, meaning that we can use multiple lines for calling a program with all the options, making it easier to read, while the script will see it as only one line. So:
someExe^
 -option1 foo^
 -option2 bar^
 -option3
Is the equivalent of writing
someExe -option1 foo -option2 bar -option3Syntax
Whenever you see a particular line, the first word or path is always the name of the program that we're executing. Everything else on that line are parameters that we're passing to the program to get it to do certain things. In order for the program to know what parameter is for what, you'll see things like this:
-option1 fooAnything with a - (or sometimes a --) in front of it is a parameter, and everything immediately following it up until the next parameter is its value. In the above example, the parameter -option1 has a value of foo. Don't worry if you don't get this right away; it'll become apparent when you see the actual code.
Paths
A word of note about the name of the program that we're calling. If you see the name on its own (e.g. someExe), then the exe with that name needs to be in the same folder as the script calling it, or else be known to the computer. Generally the latter means adding its folder to the PATH variable. This is a special variable that simply contains a list of paths. When you make a call to an exe that isn't known, your computer will look in all the directories declared in PATH until it finds it. If you don't know how to change the PATH variable, this is how you do it on Windows and this is how you do it on Mac.
Again, this isn't something that we need to do. An alternative to this is to simply enter a relative or full path to the exe in question. Instead of calling 7z to access the 7Zip program, you'd call C:/Program Files/7-Zip/7z, or ../../relative/path/to/7-Zip/7z. Generally, absolute paths are easier to deal with. If your path contains a space, then be sure to escape it (add a \ before the space), or put quotes around the full path.
:: call the program "Foo", which is in the same folder
./foo

:: or if we're on Windows, or the folder where "Foo" is located is in the PATH variable
foo

:: "Foo" is in the folder up one level
../foo

:: up two levels
../../foo

:: up two levels and in a sub-folder
../../FooFolder/foo

:: direct path (in quotes as there's a space in "Program Files")
"C:/Program Files/FooFolder/foo"
The folder structure
We're going to follow a defined folder structure to keep things organised. While you don't have to keep the same thing, you should at least use it until your comfortable with the script before changing anything.
This is what you'll find if you download the files at the end of the post:
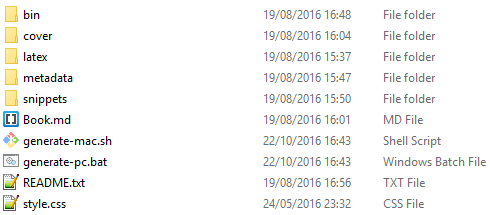
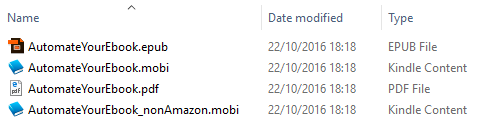
- bin/ - The folder where our final Ebooks are going to be saved
- cover/ - The folder where we keep our cover images. There are two: one JPG and one PDF. The PDF cover is simply the JPG saved as a full page PDF. Most graphics programs will let you do this
- latex/ - The folder where we keep our snippets for Latex, the language that we use to generate our PDF. The file inside, titlesec.tex, simply makes sure that each new chapter in our book starts on a new page
- metadata/ - The folder containing the metadata about our book. There are two files inside, one for the EPUB/MOBI and one for the PDF. Simply edit the contents so they're about your book
- snippets/ - An optional folder for snippets, or additional content to add to your book. I use this if I generate pre-release and post-release versions of my book, where I can change the content of the Thank you page accordingly
- Book.md - Our book file, in Markdown format. You don't have to write your book in Markdown - it could just as easily be a Word doc - but it's very easy to use and makes converting to HTML (the format for webpages and EPUBs) a cinch
- generate-mac.sh - The shell file to generate our book (Mac). Everytime you want to make a new version, you'd simply run this, either by double-clicking on it, or opening the command line and typing its name
- generate-pc.bat - The batch file to generate our book (Windows). Everytime you want to make a new version, you'd simply run this, either by double-clicking on it, or opening the command line and typing its name
- README.txt - A simple README text file describing the files and how to run the script. It also contains a checklist of everything you need to change in order to run this script on your own book
- style.css - As EPUB (and thus MOBI) are based on HTML, you handle the style of your book in the same way as you'd style a webpage. The style.css file contains a number of declarations to have a simple, yet clean, output
The code
Alright! Let's get down to business. I'm going to explain the different sections of code in the script. Don't worry too much about copying them all down; it's all in the generate-pc.bat/generate-mac.sh file.
To show you that everything works, you'll also have a full working sample of turning this very post into a small Ebook. Feel free to play around with it and change whatever you want in order to get the hang of things.
Step 1: The setup
The first thing that we're going to do is declare the locations of the different tools that we're going to use while building our books. You'll need to change the location to the equivalent on your computer.
set ZIP="C:/Program Files/7-Zip/7z"
set KINDLEGEN="PATH-TO-KINDLEGEN/kindlegen2-9/kindlegen"
set OPFPATCH="PATH-TO-OPFPATCHER-EXE"
set BOOKNAME="AutomateYourEbook"
Note that the .exe at the end of programs is implicit - e.g. you can have kindlegen2-9/kindlegen or kindlegen2-9/kindlegen.exe.
For the BOOKNAME variable, this is to make it easier when it comes to changing it for your own book, as you only need to change it in one place rather than 100. So if you see %BOOKNAME%.epub, you can read AutomateYourEbook.epub.
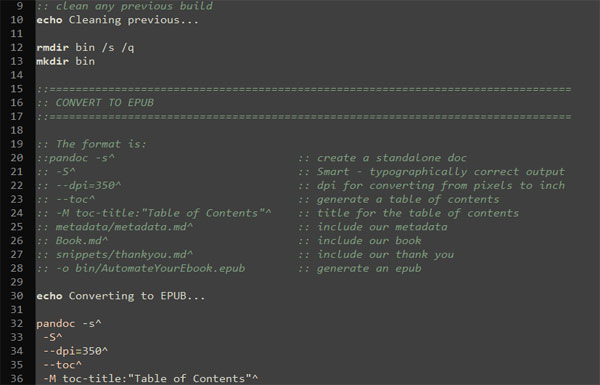
Next we're going to clean up any previous build results so that don't have any old files hanging around. The easiest way to do this is to simply delete the bin/ folder and recreate it.
echo Cleaning previous...

rmdir bin /s /q
mkdir bin
Step 2: Converting to EPUB
The first conversion that we're doing is getting our EPUB. We're going to use the fantastic Pandoc for this, and the code looks like:
pandoc -s^
 -S^
 --dpi=350^
 --toc^
 -M toc-title:"Table of Contents"^
 metadata/metadata.md^
 Book.md^
 snippets/thankyou.md^
 -o bin/%BOOKNAME%.epub
Remember that ^ indicates a run-on line, so everything after pandoc is the equivalent of a single line. To understand what's going on:
pandoc- We're calling the Pandoc exe here. When you install Pandoc, it'll automatically add itself to thePATHvariable, so we're able to call it without specifying where it is-s- We're creating a standalone document, meaning that it'll generate a proper file rather than just a snippet-S- We want typographically correct output; straight quotes to curly quotes, using em-dashes, etc--dpi=350- We want a resolution of 350 dots per inch. When working with pixels on something that could be printed, we always need to declare the DPI. As a general rule of thumb, 72 DPI is screen resolution, 300+DPI is print resolution--toc- We want to generate a table of contents-M toc-title:"Table of Contents"- We want to use "Table of Contents" as the title for our table of contents pagemetadata/metadata.md- Include the metadata for our book. NOTE: when including files, they're taken in orderBook.md- Include the book itselfsnippets/thankyou.md- Include the Thank you snippet (optional)-o bin/%BOOKNAME%.epub- Save the output in the bin/ folder and call it AutomateYourEbook.epub (remember,%BOOKNAME%expands toAutomateYourEbook)
Step 3: Converting to PDF
For the PDF version, we have 3 steps:
- Generate the text version of the book
- Combine the text version with our previously generated cover to create the final version
- Delete the text version as we don't need it anymore
The code:
pandoc -s^
 -S^
 --dpi=350^
 -V colorlinks=true^
 -V geometry:paperwidth=5in^
 -V geometry:paperheight=8in^
 -V geometry:left=0.5in^
 -V geometry:right=0.5in^
 -V geometry:top=0.5in^
 -V geometry:bottom=1in^
 -V fontsize=11pt^
 -V linestretch=1.4^
 -V indent=true^
 -V subparagraph=true^
 -V documentclass=report^
 -H latex/titlesec.tex^
 metadata/metadata_pdf.md^
 Book.md^
 snippets/thankyou.md^
 -o bin/%BOOKNAME%_text.pdf
What's going on:
pandoc- Again, we're calling Pandoc to generate our file-s- We're creating a standalone document-S- We want typographically correct output--dpi=350- Use a DPI of 350 dots per inch - Important as PDFs are often printed-V colorlinks=true- Colourise any HTML links found in the book so readers know that they're links-V geometry:paperwidth=5in- Set the physical width of our page to 5 inches-V geometry:paperheight=8in- Set the physical height of our page to 8 inches-V geometry:left=0.5in- Add a margin of half an inch to the left side of the page-V geometry:right=0.5in- Add a margin of half an inch to the right side of the page-V geometry:top=0.5in- Add a margin of half an inch to the top of the page-V geometry:bottom=1in- Add a margin of an inch to the bottom of the page-V fontsize=11pt- Use a font size of 11pt - NOTE: when talking about print documents, we use font sizes in pt rather than px, which is pixels (what we'd use on the web)-V linestretch=1.4- Set the line height to 1.4 times the font size. Bigger values mean that your lines are further apart-V indent=true- All paragraphs are indented-V subparagraph=true- Use the default sub paragraph (which is necessary for the script that we use to put chapters on their own pages)-V documentclass=report- Latex has a number of default document classes, or templates, to use for your book. For this example, I've found that the report class, matched with our title-on-a-new-page snippet, gives a good overall output. If you're more familiar with Latex, you can define your own document class to get full control. NOTE: there's also a book document type that you can check out to see if it fits your needs-H latex/titlesec.tex- Use the snippet that will make new chapters go on their own pagemetadata/metadata_pdf.md- Add the metadata for our PDFBook.md- Add the book itselfsnippets/thankyou.md- Add the Thank you snippet (optional)-o bin/%BOOKNAME%_text.pdf- Save the output in the bin/ folder and call it AutomateYourEbook_text.pdf
Now that we have the text version of our book, we want to combine it with the cover:
pdftk cover/cover.pdf bin/%BOOKNAME%_text.pdf cat output bin/%BOOKNAME%.pdfWhat's going on:
pdftk- We're calling the PDFToolkit program here. Again, it should add itself to yourPATHwhen installingcover/cover.pdf- Take the cover PDF filebin/%BOOKNAME%_text.pdf- Take the text version of our bookcat- Combine (concatenate) themoutput bin/%BOOKNAME%.pdf- Save the output in the bin/ folder and call it AutomateYourEbook.pdf
Finally, we can get rid of the text version of the book as we don't need it anymore:
rm bin/%BOOKNAME%_text.pdfStep 4: Converting to MOBI
Converting to MOBI is an optional step. I do it because I want to edit the files to add a few more things to the menu, but you can simply take your EPUB file and upload it directly to Amazon. Similarly, if you want to generate a MOBI, but don't care about editing anything inside it, you can just skip to the second last step.
To do everything we need to:
- Unzip our EPUB
- Call OPFPatcher to patch our additions. For the Amazon version, we're going to be creating it without a cover (as they combine the cover when you upload your file), so we also delete any cover files
- Rezip to a new EPUB
- Convert our EPUB to MOBI
- Finally, remove any temporary files
First, unzip our EPUB:
%ZIP% x bin/%BOOKNAME%.epub -o./bin/%BOOKNAME% > nulWhat's going on:
%ZIP%- We're calling the 7Zip program, but using the path that we declared as a variable at the start of the scriptx bin/%BOOKNAME%.epub- Unzip our bin/AutomateYourEbook.epub file-o./bin/%BOOKNAME%- Unzip it to the folder bin/AutomateYourEbook (which will be created)> nul- This is just a trick to set the output of 7Zip to nowhere (nul), meaning that we won't see it on the screen
Call the OPFPatcher to patch in our changes. To get the names of the files that we're going to use, you can simply unzip the EPUB once manually to find them.
call %OPFPATCH% -i bin/%BOOKNAME%/content.opf^
 --cover-html cover.xhtml^
 --book ch004.xhtml^
 --bob ch029.xhtml
What's going on:
call %OPFPATCH%- We're calling the OPFPatcher program, using the path that we declared as a variable at the start of the script-i bin/%BOOKNAME%/content.opf- The path to our OPF file. The OPF file is what declares the contents of the Ebook, what to put in the menu, what to put in the spine etc--cover-html cover.xhtml- This is the name of the file containing our cover, which will be deleted--book ch004.xhtml- The "book" part of the Ebook starts here. Before this you can have the table of contents etc. This entry means that when readers first open your Ebook, they fall on the right page immediately--bob ch029.xhtml- The "back of the book" section starts here. This can include Acknowledgements, Thank you, etc
For a full list of the options, check out the post on the OPFPatcher
As we're getting rid of the cover entry, we can also delete the files, making our final MOBI file smaller:
rm bin\%BOOKNAME%\cover.xhtml
rm bin\%BOOKNAME%\media\cover.jpg
We can now rezip the folder into an EPUB again. We'll use a temporary name for it:
cd bin/%BOOKNAME%
%ZIP% a ../%BOOKNAME%_kindle.epub * > nul
cd ../../
What's happening there is that we're zipping all of the contents of the folder to a file called AutomateYourEbook_kindle.epub and outputting any messages to nul (i.e. hiding them).
We can now use Amazon's KindleGen program to convert the EPUB to MOBI:
%KINDLEGEN% bin/%BOOKNAME%_kindle.epub -o %BOOKNAME%.mobiThe %KINDLEGEN% variable refers to the path that we declared at the start of the script.
Finally, we can remove the unzipped folder and our modified EPUB, which we don't need anymore.
rmdir bin\%BOOKNAME% /s /q
rm bin/%BOOKNAME%_kindle.epub
We now have a MOBI file that we can use when uploading to Amazon - Amazon will combine it with the cover of the book at that point.
Step 5: Creating a non-Amazon MOBI
We can run nearly the exact same steps again for generating a MOBI for use outside of Amazon. This can be handy if you're distributing review copies or for certain promos.
There are only two differences. One is with the call to the OPFPatcher, where we specify that we want to keep the cover:
call %OPFPATCH% -i bin/%BOOKNAME%/content.opf^
 --book ch004.xhtml^
 --bob ch029.xhtml^
 --keep-cover
And the second is when we're generating the MOBI file, we specify a different name for it, in this case AutomateYourEbook_nonAmzon.mobi:
%KINDLEGEN% bin/%BOOKNAME%_kindle.epub -o %BOOKNAME%_nonAmazon.mobiRunning the script
If you're running this for your own book, you'll need to modify the relevant parts in the script before doing anything. If you want to just run it to see the output, then you can just run it as it, and it'll produce the Automate Your Ebook Ebook.
To run it, we can do one of two things.
Running by double-clicking on it
The simplest solution. Simply double-click on the file. It will run the code and automatically close the window afterwards. When you're sure that everything is working, this is the way to go. If you're just getting started, then you might want to read any output before the window is closed, so go for option 2 instead.
If you're on a Mac, you'll need to make the file exectuable before double-clicking on it will work. To do this, simply open a new Terminal window (hold ⌘ + Space and type "Terminal", then Enter). Once opened, type chmod +x, then drag the file into the Terminal window so it auto fills in the path. Make sure there's a space between the +x and the path. The final command should look something like this:
chmod +x ~/Documents/Writing/AutomateYourEbook/generate-mac.shHit Enter and it'll modify the file permissions so we can double-click on it.
Running in the command line/Terminal
This will let you see any potential errors or warnings - always a good thing if this is your first time doing it with a new project, as for one, it'll show you errors when generating the final MOBI file.
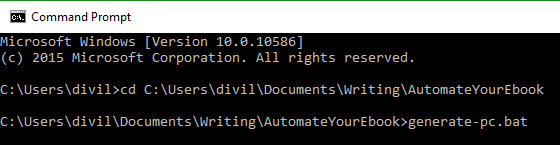
For Windows we need to open a command terminal in the right folder. There are two simple ways to do this. One is to click in the address bar of the folder itself and type "cmd". This will open a new terminal window at the right place. Otherwise we can open a new window from the Start menu. If you're on Windows 10, hit the Windows key (normally between the Fn and Alt keys) and type "cmd", then Enter. On other versions of Windows, you can enter "cmd" in to the Run command. Once you have the window open, type cd, then drag the right folder into the command window. This will copy the path (make sure there's a space between the cd and the path). Hit Enter and you're there.
For Mac, open a new Terminal window (hold ⌘ + Space and type "Terminal", then Enter), type cd, and drag the folder into the Terminal window to copy the path. Make sure there's a space between the cd and the path, hit Enter, and you're there.
Once in the right folder, simply type ./ followed by the name of the script (you can start typing "gen", then hit Tag to auto-complete), and hit Enter to execute it. The ./ at the start is only to say that we're looking inside the current folder, so it's not always necessary (it generally isn't on Windows).
Testing your files
To view your EPUB files, there are a variety of programs at your disposal. Personally I use Adobe Digital Editions, which have desktop, Android, and iOS versions. You can also use Calibre, which is an Ebook management software and has the benefit of allowing you to verify that your metadata has been embedded properly.
To actually see what your MOBI looks like and to make sure all the menu links are fine, you can download the Kindle Previewer programmer, which will let you open your MOBI file.
You can also use your Send to Kindle program to actually send it to your device, which is always recommended as nothing beats the actual hardware. If you don't have a Kindle device, they also provide Android and iOS versions.
PDF is the simplest of the lot, as you can use Adobe Acrobat Reader, which again also has Android and iOS versions, or you if you're using an up-to-date browser such as Chrome, you can simply open the PDF directly, as they now support native viewing.
The final result
There you have it! It's a lot to take in at first, but the joy of this is that once you have it done, you don't need to understand it anymore; you simply run the script every time you have a change and get your new files.
To see it in action, check out the files at the end of the post. They take this very post and make it an Ebook, which shows you just how easy it is.
NOTE: In the download, the script will be named with a .txt file extension. You'll need to change this to .bat (Windows) or .sh (Mac) to actually run it. The reason for this is that some browsers will block a zip download if there's an executable file inside.
Of course, if you've any questions, then please, get in touch!

Get the scripts and example files
Scripts for PC and Mac, as well as a full example of this in action
Download